
uv, part 2: building and publishing packages
Creators & Contributors


This is part 2 of a series on uv. Other posts in this series:
This post
Last year I wrote a post on creating a Python command line application with Click using a cookiecutter template, building with setuptools and publishing with twine.
And more recently I published the first part in a series of posts on uv, an insanely fast Python package manager written in Rust.
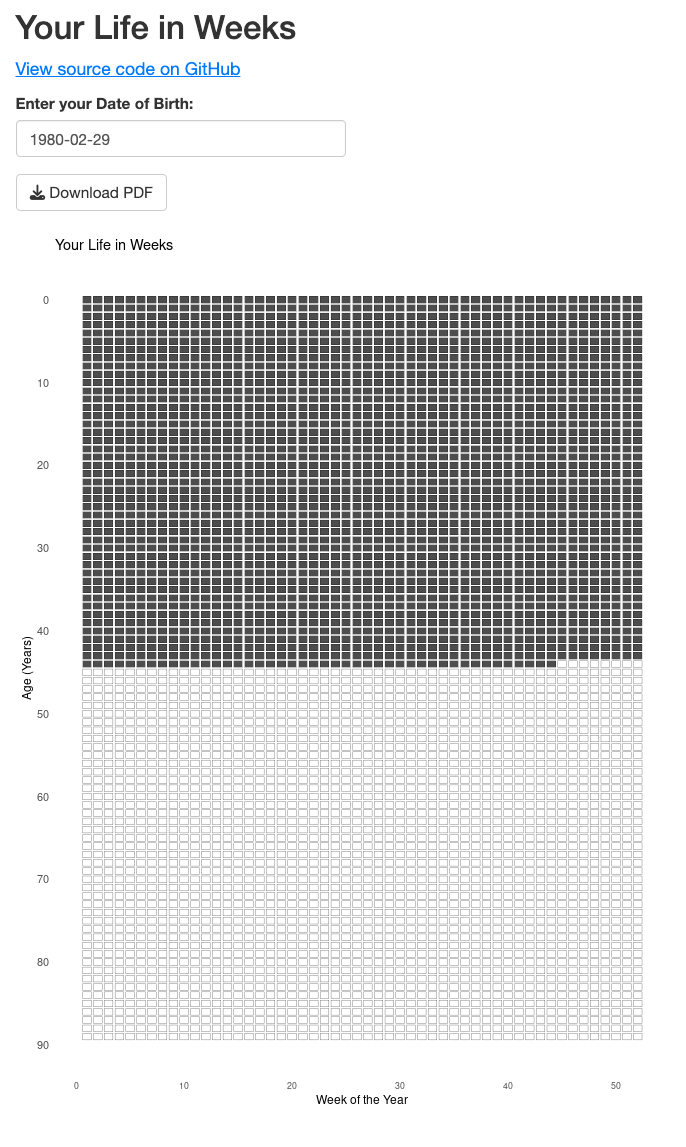
In this post I'll demonstrate how to create, build, and publish a Python package using uv. The command line tool (GitHub, PyPI) will take your birthday and gives you a printable PDF showing you how many weeks of your life you've already lived. For example, someone born on leap year in 1980 would result in the plot below:
lifeweeks 1980-02-29
If you stick around until the end, I also made an R/Shiny app to do the same thing.
Your life in weeks
Tim Urban published Your Life in Weeks over 10 years ago. It's a wonderful, thought-provoking piece. According to the CDC, Life expectancy in the US is about 77.5 years (75 for men, 80 for women). But let's be generous and assume you'll live to 90. You can visualize this as a series of boxes, 52 boxes in each row, 90 rows.
It kind of feels like our lives are made up of a countless number of weeks. But there they are —fully countable — staring you in the face… Sometimes life seems really short, and other times it seems impossibly long. But this chart helps to emphasize that it's most certainly finite.
Here's a graphic from the post illustrating how most Americans spend their weeks:

It can be a sobering reality check, but it can also be a motivating reminder that the empty boxes are yours to choose how to fill. I recommend reading Tim's post.
Building the lifeweeks Python package
I'm not going to spend any time talking about the actual code itself (see the repo). I vibe-coded the whole thing — I took a screenshot of one of the images from Tim's post, pasted it into ChatGPT with a short prompt. The code I got worked out of the box with only minimal follow up prompting for small aesthetic changes. This post is about using uv to turn this code into a python package, and to then publish it on PyPI.
Create a package
First, you'll want to create a new project with the --package flag.
uv init --package lifeweeks
cd lifeweeks
You'll see uv created a few files for you.
.
├── README.md
├── pyproject.toml
└── src
    └── lifeweeks
        └── __init__.py
We're going to delete all the contents of __init__.py (just a file to tell Python that this is a package), and we'll add three more files (all created by ChatGPT for me). You can see the contents of these files by viewing the source on GitHub.
cli.py: contains the Click command line interface.plot.py: contains the plotting code.utils.py: contains a few miscellaneous functions for validation and filename handling.
The main thing I changed in the pyproject.toml file was the project script, so that running lifeweeks will run the main() function from the cli.py file.
[project.scripts]
lifeweeks = "lifeweeks.cli:main"
Add dependencies
Because our code requires both click and matplotlib, we can add those with uv:
uv add matplotlib
uv add click
This does a few things. It adds them as dependencies to the pyproject.toml file and installs them into the virtual environment in this directory.
dependencies = [
    "click>=8.1",
    "matplotlib>=3.10",
]
Run the tool with uv
Now let's run the tool. When we run it the first time with uv, uv will install whatever dependencies it needs to, builds the package, then runs the command line tool from the package. It does this in just a few milliseconds.
$ uv run lifeweeks -h

   Built lifeweeks @ file:///Users/turner/repos/lifeweeks
Uninstalled 1 package in 0.75ms
Installed 1 package in 1ms

Usage: lifeweeks [OPTIONS] BIRTHDAY

  Generate a life-in-weeks chart for a given BIRTHDAY.
  Birthday should be entered as YYYY-MM-DD.

  Example: lifeweeks 1980-02-14

Options:
  -o, --output TEXT  Output filename (default: lifeweeks.pdf)
  -v, --version      Show the version and exit.
  -h, --help         Show this message and exit.
Build the package
When we initialized the project it uses hatchling as the default backend build system. You don't need to fuss with hatchling details. Just run uv build. This takes about 1 second to build both the source distribution and the binary (wheel) distribution in your dist/ folder.
$ uv build

Building source distribution...
Building wheel from source distribution...
Successfully built dist/lifeweeks-1.0.0.tar.gz
Successfully built dist/lifeweeks-1.0.0-py3-none-any.whl
Publish the package
You can push this directly to PyPI with uv publish.1 You'll first need to set the environment variable UV_PUBLISH_TOKEN to your PyPI token (or else drop it in your .bash_profile). Otherwise you'll be prompted to enter your token interactively.
$ uv publish

warning: `uv publish` is experimental and may change without warning
Publishing 2 files https://upload.pypi.org/legacy/
Uploading lifeweeks-1.0.0-py3-none-any.whl (4.2KiB)
Uploading lifeweeks-1.0.0.tar.gz (1.2MiB)
And that's it! It's now on PyPI! E.g., https://pypi.org/project/lifeweeks/.
It's probably a good idea to publish to test.pypi.org first. To do this you can instruct uv to use a different index. You'll have to supply your test.pypi token to do this.
$ uv publish \
    --publish-url https://test.pypi.org/legacy/ \
    --token $MY_TESTPYPI_TOKEN

warning: `uv publish` is experimental and may change without warning
Publishing 2 files https://test.pypi.org/legacy/
Uploading lifeweeks-1.0.0-py3-none-any.whl (4.2KiB)
Uploading lifeweeks-1.0.0.tar.gz (1.2MiB)
Running and installing your package
You can test that the package can be installed and imported with uv run:
uv run --with lifeweeks --no-project -- python -c "import lifeweeks"The --no-project flag is used to avoid installing the package from your local project directory. If that doesn't thrown an error, you're good.
As demonstrated in the last post on running tools with uv, you can run the lifeweeks tool from PyPI with uvx:
$ uvx lifeweeks -h
Usage: lifeweeks [OPTIONS] BIRTHDAY

  Generate a life-in-weeks chart for a given BIRTHDAY.
  Birthday should be entered as YYYY-MM-DD.

  Example: lifeweeks 1980-02-14

Options:
  -o, --output TEXT  Output filename (default: lifeweeks.pdf)
  -h, --help         Show this message and exit.
Or install it so you don't need the uvx. Again, notice how this takes milliseconds.
$ uv tool install lifeweeks
Resolved 13 packages in 10ms
Installed 13 packages in 32ms
 + click==8.1.8
 + contourpy==1.3.1
 + cycler==0.12.1
 + fonttools==4.55.3
 + kiwisolver==1.4.8
 + lifeweeks==0.1.3
 + matplotlib==3.10.0
 + numpy==2.2.1
 + packaging==24.2
 + pillow==11.1.0
 + pyparsing==3.2.1
 + python-dateutil==2.9.0.post0
 + six==1.17.0
Installed 1 executable: lifeweeks
Now give it a spin:
lifeweeks 1980-02-29Read more about publishing packages with uv at docs.astral.sh/uv/guides/publish. This also has information about publishing to different indexes, like test PyPI or private indexes. It's probably better to start with the documentation on managing projects with uv at docs.astral.sh/uv/guides/projects, as a package is a specialized type of project. I'll cover projects in a future post.
Bonus: lifeweeks R/Shiny app
I created the Python app code by pasting into ChatGPT a screenshot of one of these graphics with a simple prompt describing what I wanted. From here I asked ChatGPT to "make it Shiny with R" and I got a Shiny app out of it. You can hit the button below to use the app at stephenturner.shinyapps.io/lifeweeks or run it yourself by running the app.R in the repo.
Here's what the app looks like:
See the source code at https://github.com/stephenturner/lifeweeks.
If you're following along, you won't be able to publish a package called "lifeweeks" to PyPI, because I already have. You'll have to give it a different name.
Additional details
Description
Using uv to create, manage, build, and publish a Python package to PyPI
Identifiers
- GUID
- 154212224
- URL
- https://blog.stephenturner.us/p/uv-part-2-building-and-publishing-packages
Dates
- Issued
-
2025-03-24T11:00:34
- Updated
-
2025-03-24T11:00:34